找到
3
篇与
Python
相关的结果
-
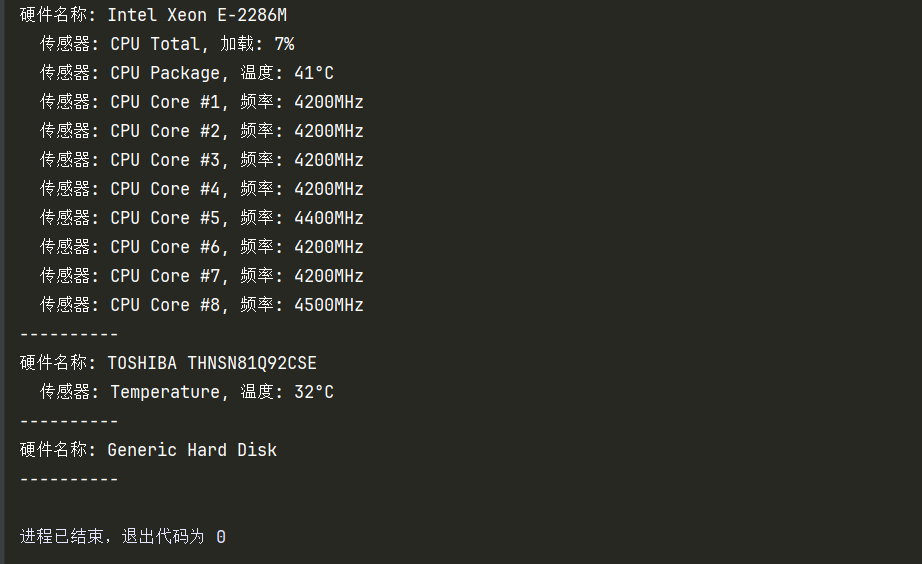
 Python利用OpenHardwareMonitorLib获取硬件信息 示例代码 # coding=utf-8 import clr # pythonnet 提供的模块 import os # 添加 OpenHardwareMonitorLib.dll 的路径 clr.AddReference(os.path.abspath("OpenHardwareMonitorLib.dll")) # 导入 Open Hardware Monitor 的命名空间 from OpenHardwareMonitor import Hardware # 创建硬件监控器实例 hardware_monitor = Hardware.Computer() hardware_monitor.CPUEnabled = True # 启用 CPU 监控 # hardware_monitor.GPUEnabled = False # 启用 GPU 监控 hardware_monitor.HDDEnabled = True # 启用硬盘监控 # hardware_monitor.MainboardEnabled = True # 启用主板监控 # hardware_monitor.RAMEnabled = True # 启用内存监控 # hardware_monitor.FanControllerEnabled = True # 启用风扇监控 # 初始化硬件监控器 hardware_monitor.Open() # 获取硬件信息 for hardware_item in hardware_monitor.Hardware: hardware_item.Update() # 更新硬件状态 print(f"硬件名称: {hardware_item.Name}") for sensor in hardware_item.Sensors: if sensor.SensorType == Hardware.SensorType.Temperature and "CPU Core" not in sensor.Name: print(f" 传感器: {sensor.Name}, 温度: {int(sensor.Value)}°C") elif sensor.SensorType == Hardware.SensorType.Load and "CPU Core" not in sensor.Name and "CPU Total" in sensor.Name: print(f" 传感器: {sensor.Name}, 加载: {int(sensor.Value)}%") elif sensor.SensorType == Hardware.SensorType.Clock and "Bus Speed" not in sensor.Name: print(f" 传感器: {sensor.Name}, 频率: {int(sensor.Value)}MHz") print("----------") # 关闭硬件监控器 hardware_monitor.Close()输出结果 温度.png图片
-
Python-IP归属地查询 百度API API:https://opendata.baidu.com/api.php?query=113.89.235.182&co=&resource_id=6006&oe=utf8 API1:https://opendata.baidu.com/api.php?co=&resource_id=6006&oe=utf8&query=113.89.235.182 响应json: { "status": "0", "t": "", "set_cache_time": "", "data": [ { "ExtendedLocation": "", "OriginQuery": "113.89.235.182", "appinfo": "", "disp_type": 0, "fetchkey": "113.89.235.182", "location": "广东省深圳市 电信", "origip": "113.89.235.182", "origipquery": "113.89.235.182", "resourceid": "6006", "role_id": 0, "shareImage": 1, "showLikeShare": 1, "showlamp": "1", "titlecont": "IP地址查询", "tplt": "ip" } ] }本地数据库 Ip2region GitHub地址 官方示例 # Copyright 2022 The Ip2Region Authors. All rights reserved. # Use of this source code is governed by a Apache2.0-style # license that can be found in the LICENSE file. # from xdbSearcher import XdbSearcher def searchWithFile(): # 1. 创建查询对象 dbPath = "../../data/ip2region.xdb" searcher = XdbSearcher(dbfile=dbPath) # 2. 执行查询 ip = "1.2.3.4" region_str = searcher.searchByIPStr(ip) print(region_str) # 3. 关闭searcher searcher.close() def searchWithVectorIndex(): # 1. 预先加载整个 xdb dbPath = "../../data/ip2region.xdb" vi = XdbSearcher.loadVectorIndexFromFile(dbfile=dbPath) # 2. 使用上面的缓存创建查询对象, 同时也要加载 xdb 文件 searcher = XdbSearcher(dbfile=dbPath, vectorIndex=vi) # 3. 执行查询 ip = "1.2.3.4" region_str = searcher.search(ip) print(region_str) # 4. 关闭searcher searcher.close() def searchWithContent(): # 1. 预先加载整个 xdb dbPath = "../../data/ip2region.xdb"; cb = XdbSearcher.loadContentFromFile(dbfile=dbPath) # 2. 仅需要使用上面的全文件缓存创建查询对象, 不需要传源 xdb 文件 searcher = XdbSearcher(contentBuff=cb) # 3. 执行查询 ip = "1.2.3.4" region_str = searcher.search(ip) print(region_str) # 4. 关闭searcher searcher.close() if __name__ == '__main__': searchWithContent()
-